Indicator Detail - Online Help
Performance Indicator Definition
Online help for the CleverQ performance Indicator Definition and Indicator Detail. All logic and functionality of the indicator detail form are copyrighted and patent pending.
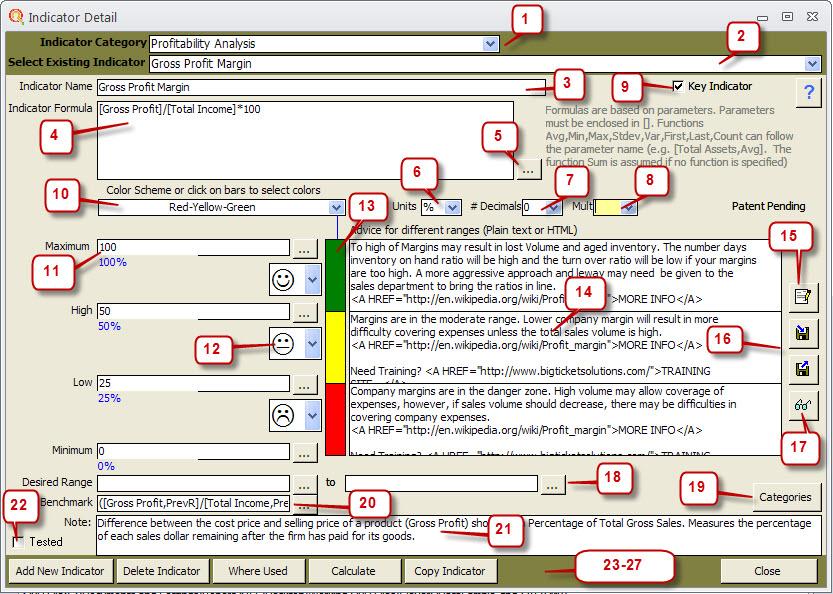
- Indicators are assigned and sorted by Category for the purpose of organization as well as reporting. Select the category of the indicator you are looking for to look at a filtered list of indicators which have been defined.
- Select the Indicator which you would like to edit or view. Any time an indicator is edited in any field, the Data Cache is cleared. When you edit a number of indicators, it is advisable to clear the formulas in the Data Cache so they will be repopulated with the new formulas.
- This is the name of the indicator which is to be used in gauges and reports. Make sure to name the indicators as you wish to see them.
- Enter your Formula in the Indicator Formula Box. Indicator Formula Length Limit:There is a limit of 255 characters for a text field, so if your formula is greater than 255 characters, you should break it down or shorten the names of the parameters. Parameters must be enclosed in [] and special functions must be inside the brackets. Eg., [Total Income, Avg] will produce the average total income in the date range specified in your report or gauge. A list of basic functions are listed to the right, and other special functions are in the formula builder in the next topic.
- Click the Formula builder Icon to open the formula builder. The formula builder has its own help screen. Any place throughtout the software that has a formula builder icon means that you can enter a formula in the window.
- After building your formula, select the units of measure you wish to appear in your gauges.
- Select the number of decimals you wish to show in gauges and reports.
- Select the Multiples drop down box if you wish to show your values in Hundreds, Thousands, or Millions. There are times that the results will be too large for a gauge and give you a jumbled look to your gauge resulting from the overlap of numbers. This will move the decimal place and be helpful when you are dealing with large formula results.
- If this is a Key Indicator to your company, enter a check mark in the box. Reports are filtered by Key Indicators if you wish.
- Pre-defined color schemes are available in the drop down box for the Gauge colors. You are not required to enter color schemes to your gauges.
- Enter the minimum, low, high and maximum ranges for your gauge. For example, a tachometer which measures the Revolutions per Minute of your car may go from 0-7000 Re mph. It may redline at 5000 and may quit Idling at 800 RPMs. In this case, the minimum would be 0, the low would be 800, the high would be 5000, and the upper maximum limit of the gauge would be 5000. If the actual value of your indicator exceeds the maximum limit of your gauge, the software will automatically adjust the upper limit of the gauge upward to the value of your indicator.
- If you wish, you can enter an emoticon to each range of the indicator. The emoticon will show up on some reports and can be filtered by emoticon.
- If you wish to have custom colors, click on the gauge color and a color pallet will open to select a custom color for the gauge.
- If you enter conditional advice for the high medium and low ranges, an icon will show up on the gauge notifying the viewer that conditional advice is available. When the user clicks on the Icon on the gauge, the training facilitator will open a browser window with your conditional advice. You can also enter a hyper link to open other windows by entering the following address in the following format.Need Training? <A HREF="http://www.YourDesiredWebsite.com/">Title you wish to show</A>
- Click on the Zoom icon to open a larger text window to enter your advice.
- Select the export or import advice to save your advice into an file to be used in an HTML editor such as Front Page if you wish to have a true webpage look to your advice.
- Select the View Advice button if you wish to see your advice in a training facilitator window like the end user would view the advice.
- Enter the Desired range from and to for the lower and upper limits. This is handy if you wish to do a filtered report of Indicators out of Desired Range.
- Assign a category to you indicators to organize them and to do reports on indicator categories. the Categories window has its own on-line help.
- Enter a benchmark if desired to your indicator. This could come from your budget, a formula, the previous year or period, a static number, or any other source you wish.
- Enter notes about your indicator. These notes wil appear on Scorecard reports to explain the indicator.
- Once you have verified that the formula works and is producing the desired results, check the Tested box to remind yourself that it has been tested. CleverQ is not responsible for the results of any formulas, so it is the administrators responsibility to test and verify all formulas.
- Add New Indicator gives you a blank indicator to start entering information from scratch.
- Delete Indicator will delete the indicator that is shown. You must delete any gauges the indicator is used in before deleting. A warning window will pop up telling you where the indicator is currently used.
- Calculate will open a window where you can set a date range and data type and test the result of the formula in the Indicator formula based on your data and parameters.
- Copy Indicator will copy the current indicator and add the word (copy) to the end of the Indicator name. Then modify the copy to your specifications and rename the copy to your liking. This is helpful in speeding up setup for indicators which are similar.
- Close the window will save your indicator and close the Indicator Detail window.