Parameter Detail-Online Help
Data Source Integration
Online help for parameter details to integrate data sources and aggregate data source integration.
Once you have extracted your data, it is required to name the data which will be used in calculations. Since CleverQ extracts data from multiple data sources, you must define which Report Name (Source) the data is coming from, what Row Name you will be using, and for some repots, the Column type of data you willl need. Defining parameters is a similar concept to naming a range or cell in Excell in that the Named Parameter can be either the source of the data or a calculation using other sources. Once the data is named, the Parameter Name can be used in calculations for Indicators or other Calculated Parameters.
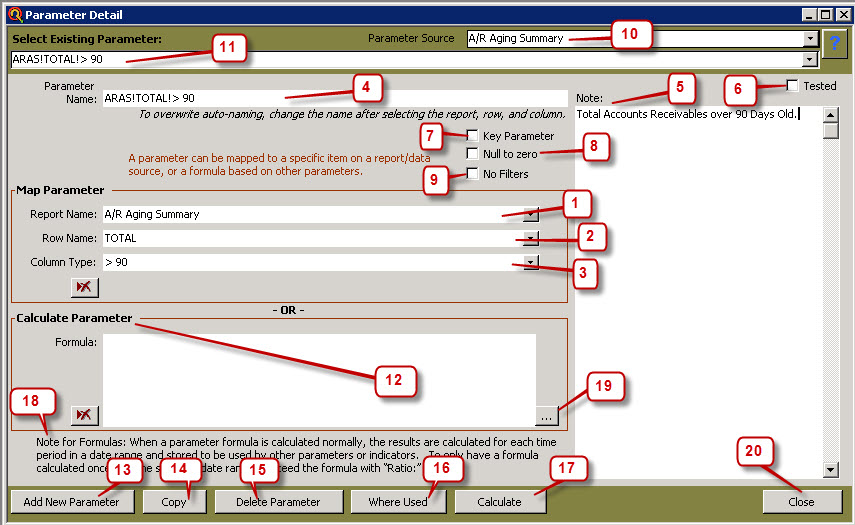
- Select the source Report Name where the data is coming from. The report will be available on the drop down menue after you have extracted the report from its data source.
- Select the Row Name of the report. For example, this may be the account name from the P&L, or as shown above, the Row Name "TOTAL" taken from the A/R Aging Summary Extracted from QuickBooks. If you are using filters in your extractions, select "Use Filters" in the row name.
- The Column Type is used in some reports. Select the Column type of the data you wish to use if there is a Column type available. If there are none available, leave this blank.
- As you map a parameter in steps 1-3, the parameter is automatically named for you using a standard naming convention. If you would like to change the name, simply type over the name after it has been mapped. If you change the name of a parameter after it has been used in the program, you will be prompted if you want to change the name in all of the parameters and indicators where it is used. Generally select Yes. If you choose no, all of your formulas will be broken, as the old parameter name will no longer exist. If this happens, you must either fix all of your formulas or recreate the old parameter name.
- Enter any notes to remind the administrator about the parameter.
- The Tested box is a place where the administrator can optionally check off to remind themselves that the data calculated by the parameter has been verified and tested to be correct. Use the Calculate button (#17) to compare your data against its origional source.
- A Key Parameter is a place where the administrator can remind themselves that the parameter should not be tampered with. Reports on Parameters can also be filtered by Key Parameter.
- Nulls to Zeros is sometimes needed. By default, CleverQ will convert nulls to zeros when calculating and displaying a range of data. However, there are times that if a mapped parameter is used in another parameter formula, nulls to zeros may be needed to force the return of zero. It is recommended to leave unchecked unless you are experiencing problems with indicators returning a Null result.
- No Filters is used when you are mixing parameters which are filtered with parameters that are not filtered in the same formula. For example, if you wanted to have a filterable indicator where you can see an individual employees wages as a percentage of the Total wages, you would select No Filters for the Total Wages parameter, and leave the box unchecked for the Filtered Employees Wages Parameter. Otherwise when using parameters which are filtered, all parameters within a formula must have the same filters set when they are extracted.
- Parameter Source drop down box is a fast and easy way to find the parameters which have already been created. When searching for a parameter, select its source to filter out other parameters.
- Select the parameter you wish to work with from the drop down menue.
- Calculated parameters are formulas using other mapped or calculated parameters. The formula can be built using the formula builder or typed in. A parameter may be either mapped or calculated, but not both.
- Add a New Parameter by selecting the button, and get a new screen ready for input.
- If the Copy button is selected, all of the data in the current parameter is copied to a new parameter with the word Copy added to the parameter name. This feature speeds up setup for paramters which are similar.
- Caution - Delete Parameter will delete the currently viewed parameter. If you choose to delete a parameter which is already used in other indicators and and/or parameters, the parameters where it is used will be deleted as well. You will receive a warning notice and a list of where the parameter is used.
- Where Used will give you a list of where the currently viewed parameter is used in other parameters and indicators throughout CleverQ. It will not tell you if it is used in the report manager.
- Calculate will open a form to calculate, test, and verify the results of the current Indicator.
- When calculating a formula parameter, note the option to add "Ratio:" in front of the formula. This is necessary for certain types of formulas where you do not want to calculate the formula for each time period. For example, if you are calculating a percentage for each month which results in 25% each month, and you ask for the result for a 12 month period, the result would be 300%, which would be the sum of 12 months at 25%. If you add the word ratio, the formula will add the sum of all of the months in the range and then calculate the formula one time for the range resulting in 25%.
- When building a formula, open the formula builder for assistance if desired. The formula builder has its own help menue.
- When finished, close the window. All work will be saved automatically.