CleverQ Data File - Online help
Integrated Database
Online help for CleverQ integrated database for data integration software and data reporting tool included in CleverQ dashboard software.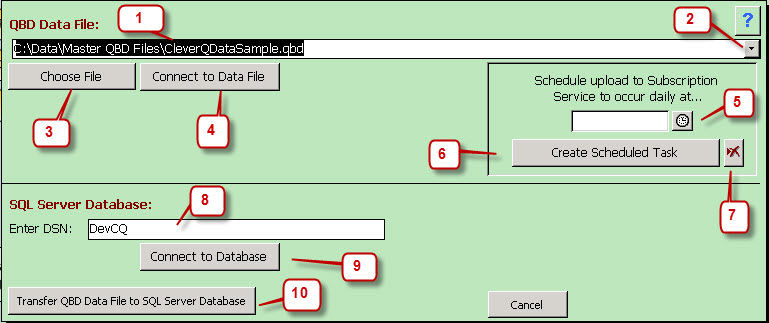
- The CleverQ Bundled Definition (.qbd) file shown is the CleverQ data warehouse file that which you wish to connect to. The .qdb file contains all of the company preferences, extracted reports, parameter mappings, indicator definitions, gauge definitions, dashboard definitions, and report definitions for your company or multiple companies. The .qbd file is an encrypted Microsoft DataBase file which is sufficient for most single companies. If your data file grows to larger than 100MB, it is suggested to convert your data file to SQL or SQL Express. Contact CleverQ support if assistance is needed.
- By selecting the drop down box, a list of all previously opened .qbd files will appear for quicker reconnection of data files.
- Choose file and browse to a qbd file of your choice. There are three files installed by default with the installation of CleverQ. They are located by default in the Public or shared documents directory in the CleverQ file.
- The "My QuickBooks Company.qdb" file has dashboard templates but no extracted data and is designed for your use to connect with your QuickBooks company file and give you a starting point with predesigned dashboards. It is suggested to copy this file and rename the copied file to a unique name such as "YourCompanyName_CleverQ.qbd". Then connect to the new file, and load your data from your QuickBooks Company File.
- The "CleverQDataSample.qbd" file has data & dashboards for your use to experiment with. The dates will automatically be adjusted when opening and is for sample purposes only. Do not use this file for your company file.
- The "CleverQData.qbd" is an empty data file if you wish to start from scratch or are not using QuickBooks. Again, copy this file and rename it to something unique to your company such as "YourCompanyName_CleverQ.qdb" You can also create a blank qbd file from the drop down file menu from within CleverQ.
- Connect to Data File once you have selected the file you wish to work with.
- If you wish to have web access, you will need to subscribe to the CleverQ Live Subscription service, this is where you would select the time to upload the information to the Cloud Server. Contact support for to subscribe.
- Create scheduled task will open prompt you for a windows user name and password and open the windows task scheduler to finish automating the upload process to the CleverQ Subscription service. CleverQ will create a scheduled task called QBUpload. Once the task has been created, open the task through the Windows control panel, and review the setting. It is suggested that the task be scheduled to run at night when no other tasks are scheduled to run. Upload time will vary with your internet connection speed.
- Select the remove button to cancel a scheduled task to the Subscription service.
- If you wish to connect to a SQL database, enter the DSN in the window.
- Connect to the SQL Server Database shown if you are using SQL rather than the qbd file.
- If you have out grown the Microsoft DataBase .qbd file (exceeding 100 MB), you can convert your file to an SQL database. SQL or SQL Express must be installed prior to transfering. Contact CleverQ support if assistance is needed.